Jerry Wang
Introduction
For years, independent crafters and Etsy sellers have been stuck in a frustrating loop. If you wanted to create vibrant, full-color stickers or apparel, you would use a traditional cutting machine like Cricut. But the moment you wanted to cut through thick plywood or engrave acrylic, you had to invest in a completely separate laser cutter—and then spend hours battling with tedious “print-and-align” calibration issues between the two systems.
Enter the xTool M2. Positioned as the market’s first desktop color craft laser, this innovative craft laser cutter combines a CMYK inkjet printer and a diode laser into a single automated workflow. Designed as an affordable laser engraver that double-hats as the best laser engraver for beginners, it bridges the gap between home paper crafting and high-precision laser cutting without a steep learning curve.
But can a single machine really replace your trusty Cricut and upgrade your entire small business production? Or are there hidden compromises behind its breakthrough price tag? In this in-depth review, we put the xTool M2 through its paces—testing everything from its magnetic dual-module workflow to its real-world performance on everyday craft materials—to see if it’s truly the ultimate game-changer for your workshop.
Comprehensive Score of xTool M2
Summary
The xTool M2 is a certified game-changer for crafters looking to graduate from traditional cutting machines like Cricut. While it strategically cuts some material costs to keep the price highly accessible, it refuses to compromise on workflow efficiency and real-world production quality.
Thanks to its intuitive software and a seamless magnetic quick-release module, the tedious ‘print-then-align-then-cut’ nightmare faced by Cricut users is completely gone. If you are an active Etsy creator ready to level up your custom full-color merchandise without breaking the bank, the xTool M2 delivers a streamlined, highly profitable production experience that is absolutely worth every penny.
xTool M2 Key Features: What Makes It Different?
What truly sets the xTool M2 apart from the saturated desktop laser market isn’t just one single specification—it’s how the hardware innovations fundamentally reshape the daily crafting experience. After extensive hands-on testing, several standout features define why this machine is a completely different beast:
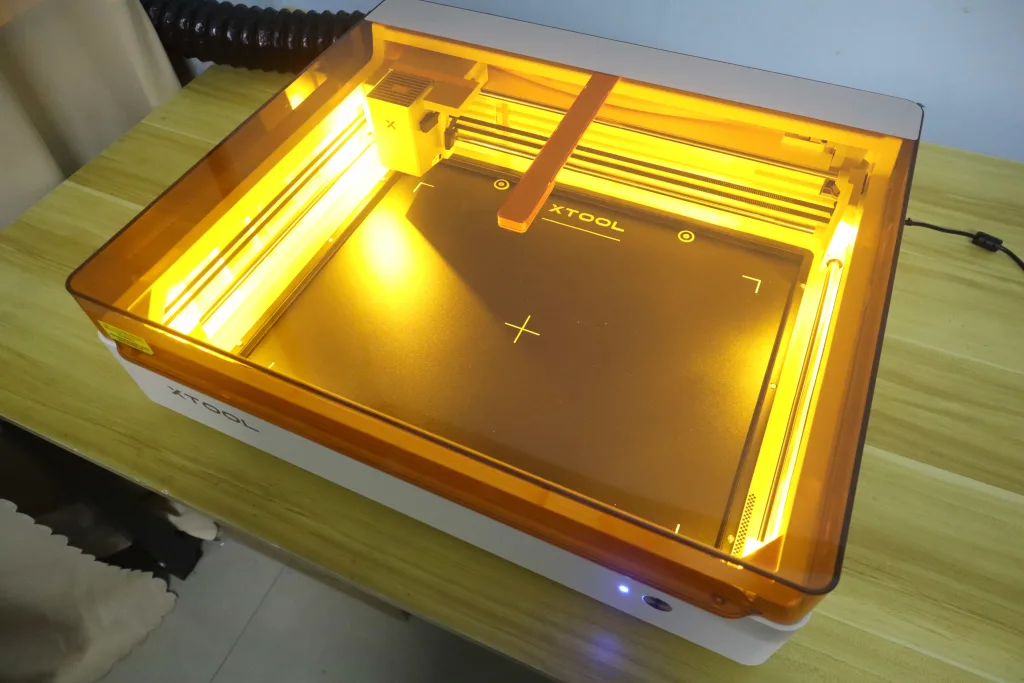
Smart Dual-Camera Alignment (Close-up + Far-field)
Instead of relying on a single, distorted wide-angle view, the xTool M2 utilizes a sophisticated dual-camera system. The far-field camera captures the entire working bed for quick drag-and-drop design positioning, while the close-up camera moves with the laser head to deliver millimeter-precise alignment on intricate, detailed project areas.
Revolutionary Multi-Module & Color Crafting Workflow
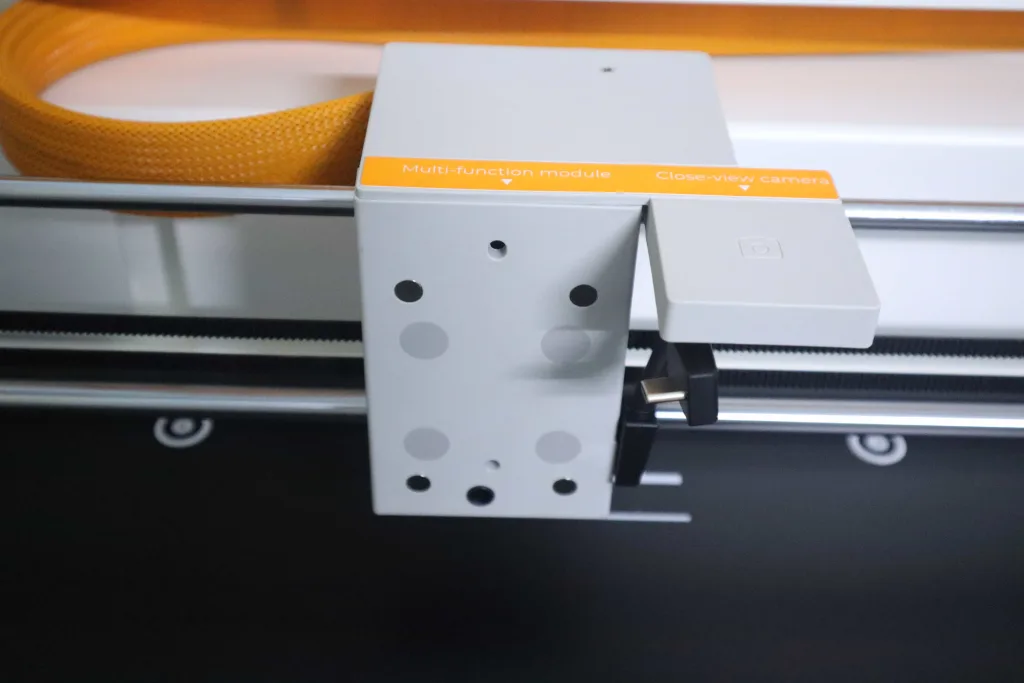
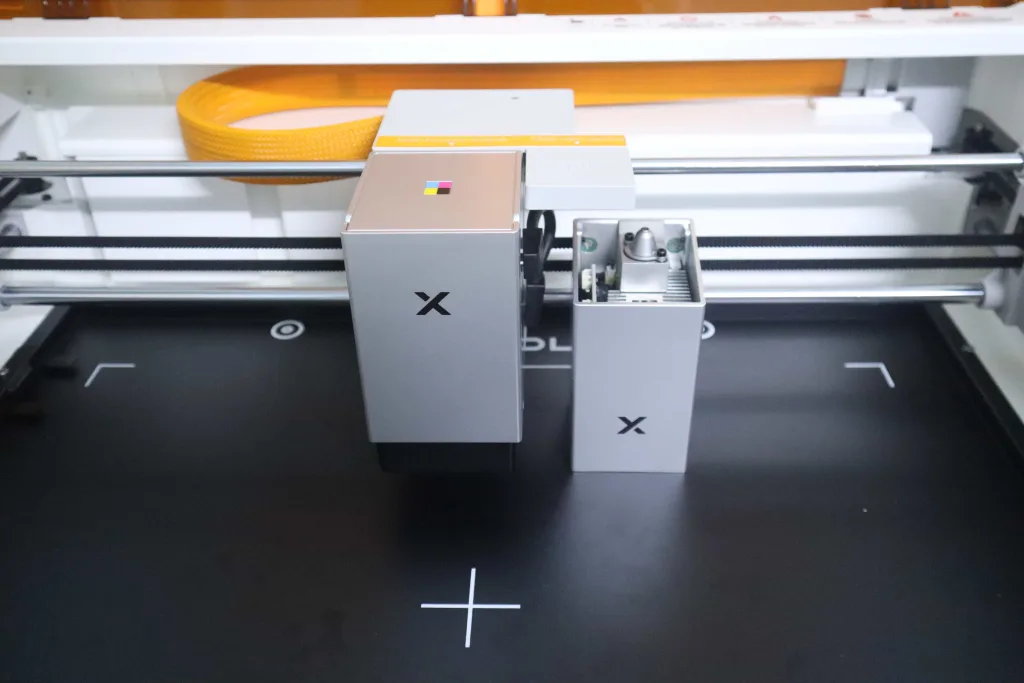
The magic of the M2 lies in its magnetic quick-release module system. The machine effortlessly hot-swaps between a 10W diode laser head and a full CMYK inkjet printing module. By stacking these two technologies, you can print vibrant, full-color designs directly onto raw materials and immediately cut them out with the laser—eliminating the calibration alignment errors that plague traditional craft cutters.
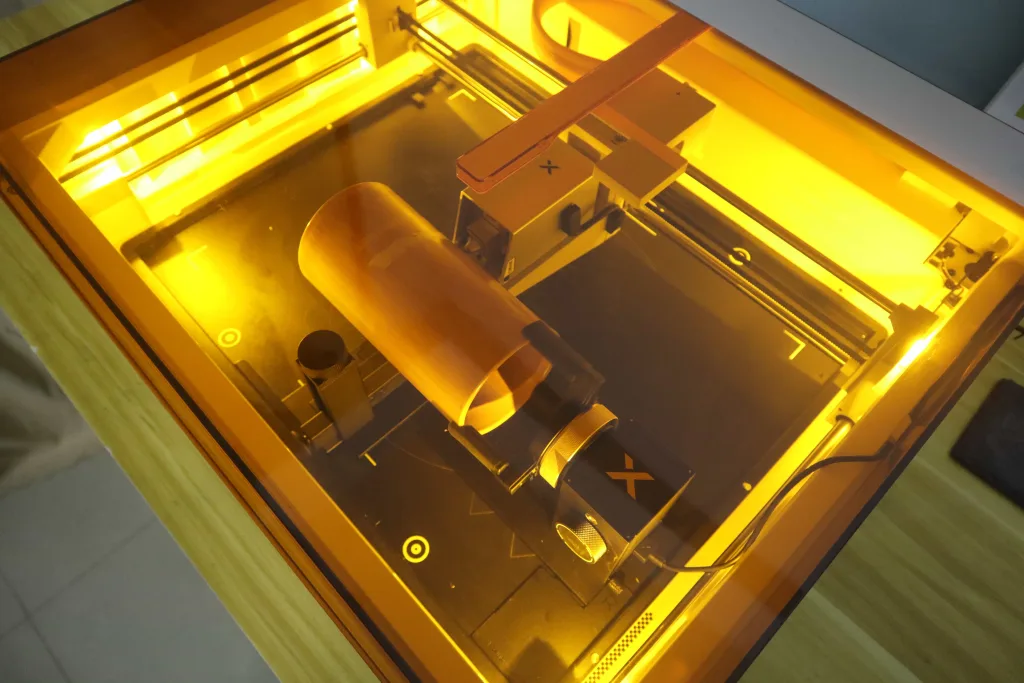
Seamless Rotary Engraving Without a Riser Base
Traditionally, engraving tumblers or cylinders required you to manually prop up your entire laser machine with risky leg extensions or remove the base plate. xTool brilliantly solves this hardware bottleneck with an innovative magnetic directional laser mount. The base allows you to tilt the laser head from a vertical to a horizontal position. Consequently, all you need to do is place your rotary attachment directly inside the machine chamber, and you are ready to engrave mugs and glasses instantly. Of course, this design might have been inspired by TOOCAA NOVA, as TOOCAA NOVA adopts a more user-friendly design, namely a 90° X-axis rotation.
The Ultimate All-in-One Software Experience
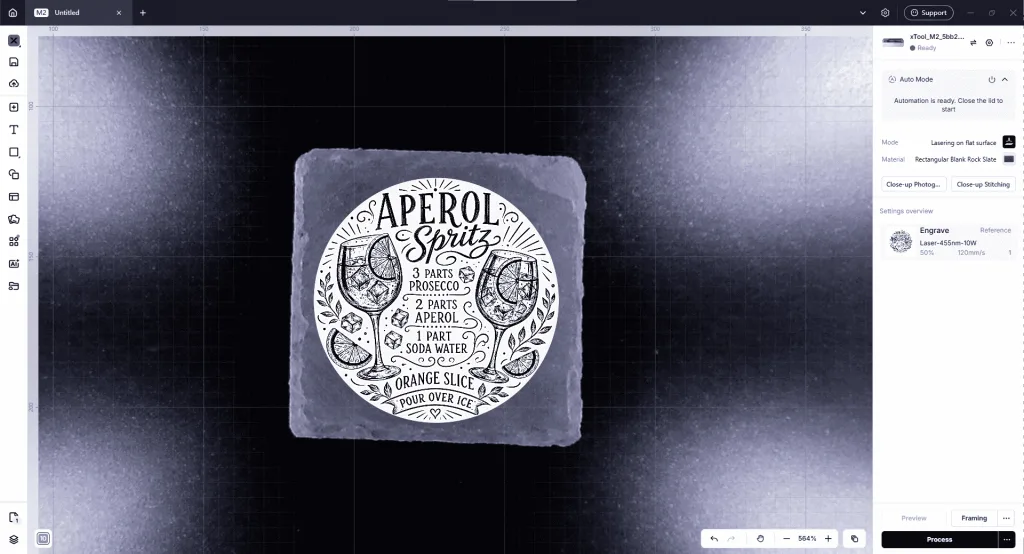
Hardware is only as good as the software driving it, and the integration with xTool Studio feels incredibly refined. The software handles all the heavy lifting in one seamless interface—allowing users to execute camera positioning, automatic material parameter settings, and framing tests with a few simple clicks.
The crown jewel of this experience is the newly introduced Auto-Mode. The software and hardware communicate so seamlessly that the moment you close the machine lid, the xTool M2 automatically triggers the cameras to take a high-res snapshot and measures the precise focal depth on its own. It strips away all the repetitive, meaningless prep work, letting creators focus purely on the joy of making.
Hands-Free Crafting: How the xTool M2 Automates the Boring Prep Work
Compared to its predecessor, the xTool M1 Ultra, the xTool M2 takes user experience to a whole new level of convenience.
A large part of this improvement comes down to the smart dual-camera integration. The far-field camera allows you to quickly position your designs across a large workspace, while the close-up camera steps in to handle precise placement of tiny, intricate items. When it comes to camera calibration and alignment accuracy, xTool nailed it. During my testing, any alignment error was practically invisible to the naked eye. What you see on your screen is exactly what you get on your finished piece.
However, the real surprise for me was the new Auto-Mode inside the desktop software. This single feature completely solves the most repetitive, mundane part of laser crafting: the tedious setup process. Once you toggle Auto-Mode on, all you have to do is drop your material onto the bed and close the machine lid.
The M2 instantly takes over—automatically snapping a fresh background photo, identifying the material’s position, and measuring the exact thickness on its own. If you are running a small production batch or frequently swapping out materials for high-frequency engraving, this automated workflow is an absolute lifesaver. It completely eliminates the guesswork and friction from your prep work.
CMYK Inkjet Module: Full-Color Printing Tested
To put the CMYK inkjet module through its paces, I decided to test its real-world performance on two very different materials that crafters work with daily: standard A4 printer paper and birch plywood.
I started with a baseline test on a sheet of ordinary A4 white paper, printing a highly detailed, vibrant color portrait measuring 266 x 152 mm. The process took exactly 4 minutes and 35 seconds from start to finish. I was genuinely impressed by the output; the color accuracy on the character’s skin tones and hair was spot-on, and the gradients transitioned seamlessly without any of the banding or pixelation you might expect from a first-generation craft hybrid. Every micro-detail of the portrait from my original digital file translated beautifully onto the paper, proving that the M2’s printing mechanism is incredibly precise when working on a flat, non-porous surface.
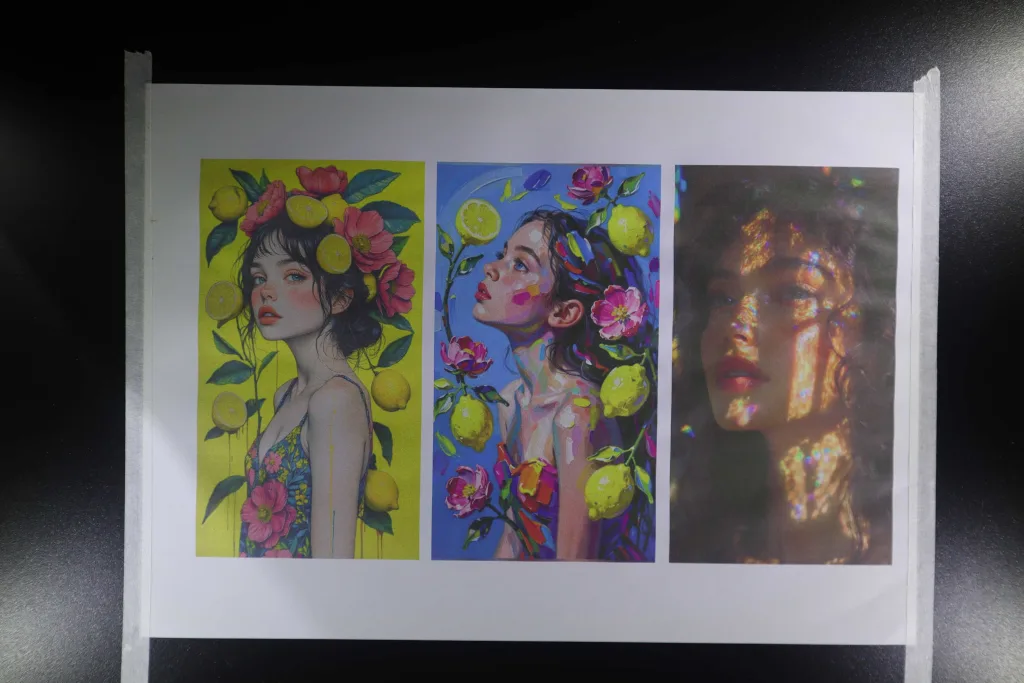
The real challenge, however, came when I swapped the paper for a piece of plywood to see how the ink interacts with organic materials. Because raw wood is naturally porous, it essentially acts as a sponge, immediately drinking up a portion of the wet ink. As a result, the final print on the plywood turned out slightly darker and more muted compared to the crisp A4 paper baseline, with some of the ultra-fine details softening due to natural ink absorption.
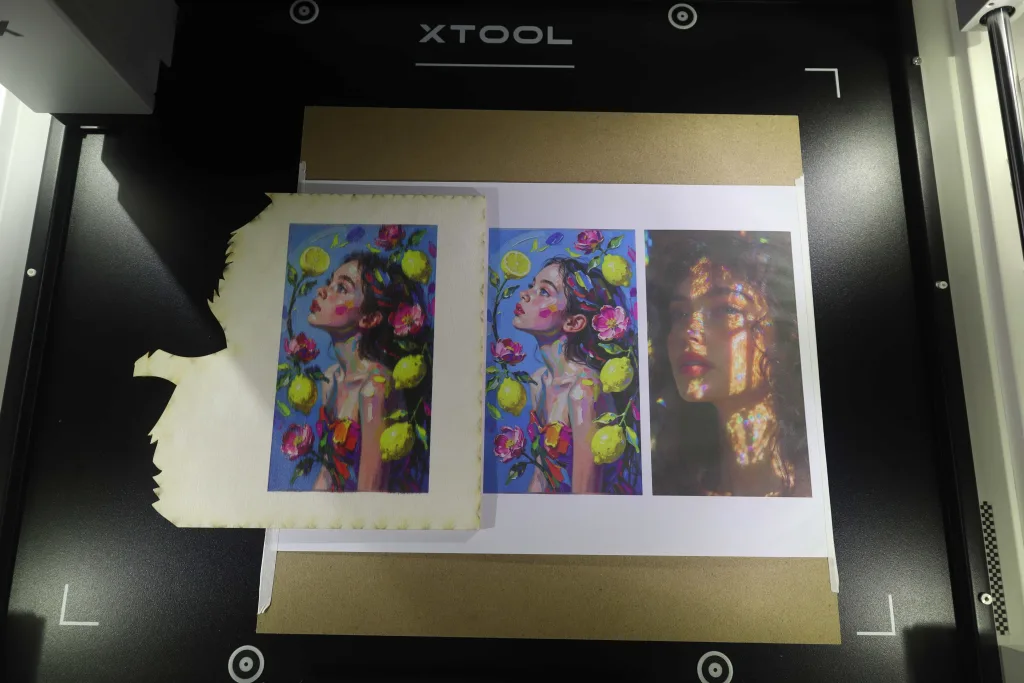
While the colors aren’t as blindingly bright as they are on white paper, the final product still looks fantastic. The wood grain subtly shows through the ink, giving the entire piece a beautiful, high-end rustic charm that is more than ready for commercial Etsy storefronts. If you do want to achieve that punchy, paper-like vibrancy on wood, a quick insider tip is to apply a very thin coat of matte clear primer or white gesso to seal the wood pores before printing. But even straight out of the box with zero preparation, the M2 handles full-color wooden crafts with impressive ease.
Is the xTool M2 the Easiest Way to Make Color Crafts?
Given its impressive ink handling, the xTool M2 has the genuine potential to completely revolutionize the daily workflow for traditional Cricut users. For years, the Cricut community has been bottlenecked by the notorious ‘Print-Then-Cut’ feature. The xTool M2 shatters this limitation as a versatile laser engraver for home use. Beyond raw wood, its camera alignment allows it to function as a precise sticker printer and cutter setup for personalized decals and labels. As a compact hobby laser cutter, it takes the frustration out of physical alignment, allowing home crafters to execute a flawless print and cut machine workflow in a single workspace.
But this isn’t just a massive upgrade for vinyl and paper crafters looking to graduate from their blade cutters. It is an equally massive game-changer for woodcraft enthusiasts who have long dreamed of adding vibrant colors to their laser projects. Traditionally, coloring wood required manual painting. The xTool M2 bypasses all of that prep work, empowering both small business owners and hobbyists with the ability to produce gorgeous, retail-ready color crafts in a fraction of the time.
Taking color woodcrafts as a prime example, the xTool Studio software delivers a robust ‘Print-Then-Cut’ graphic editing canvas and workflow. If you are working with a standard photo, the process is incredibly straightforward: the CMYK inkjet module accurately prints the original image colors directly onto the material, and then the laser module follows up by cutting along the outer boundary.
However, to truly test the limits of this machine, I wanted to move away from basic photo prints and attempt a much more complex color project using multi-layered vector graphics. Fortunately, xTool Studio handles vector editing surprisingly well.
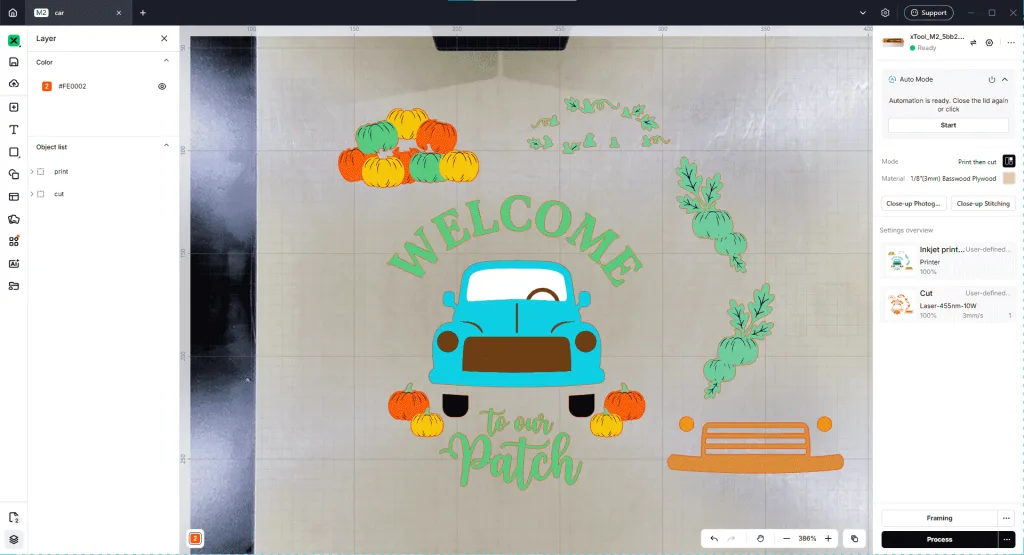
After importing my custom vector design into the software, the first step was to utilize the built-in color fill tool to shade each vector design with the exact ink colors I wanted to print. Crucially, any element filled with color must be explicitly assigned to the ‘Inkjet Print’ processing layer in the sidebar. Once the color filling was complete, I needed to generate a matching cut path for the 10W laser module. For my specific project, I simply used the software’s automatic offset function to create a clean outline around the entire graphic. As shown in the software screenshot above, the advanced vector-based Print-Then-Cut workflow was fully configured and ready to execute.
With everything fully configured in xTool Studio, I started the Print-Then-Cut process following the onscreen prompts. During the inkjet printing phase, the CMYK module glided smoothly across the plywood, accurately depositing the rich colors onto the wood surface. The moment the print engine finished its pass, the software neatly paused and prompted me to swap out the inkjet head for the 10W laser module. The mechanical hot-swap takes only a few seconds and requires zero tech-savviness.
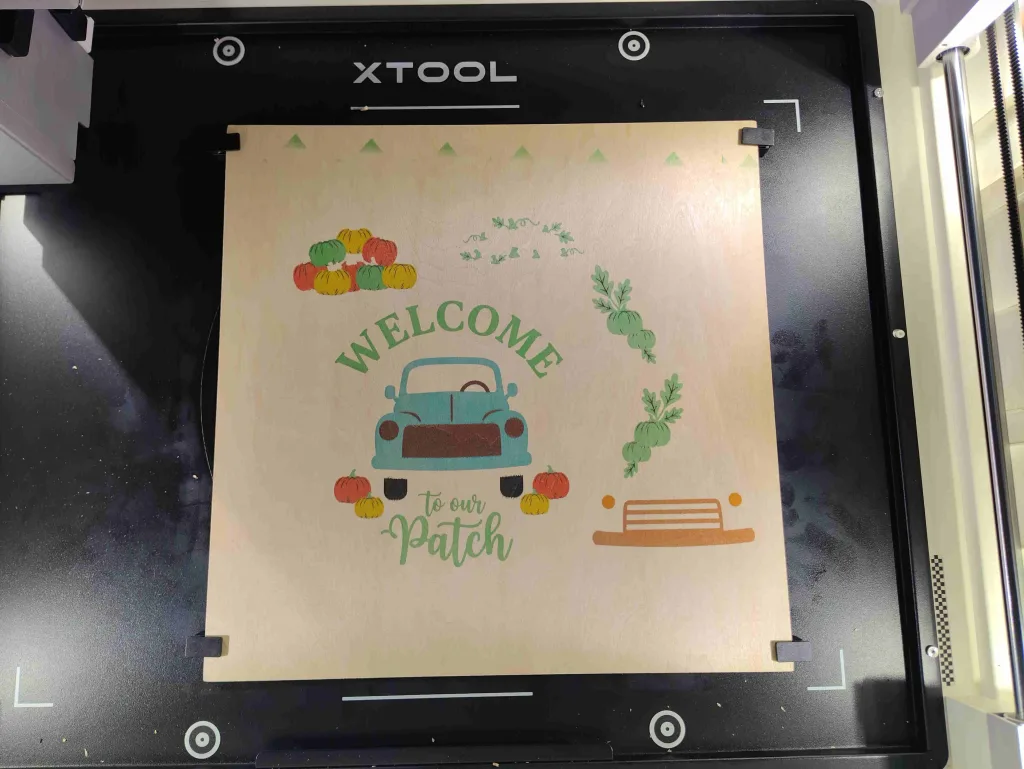
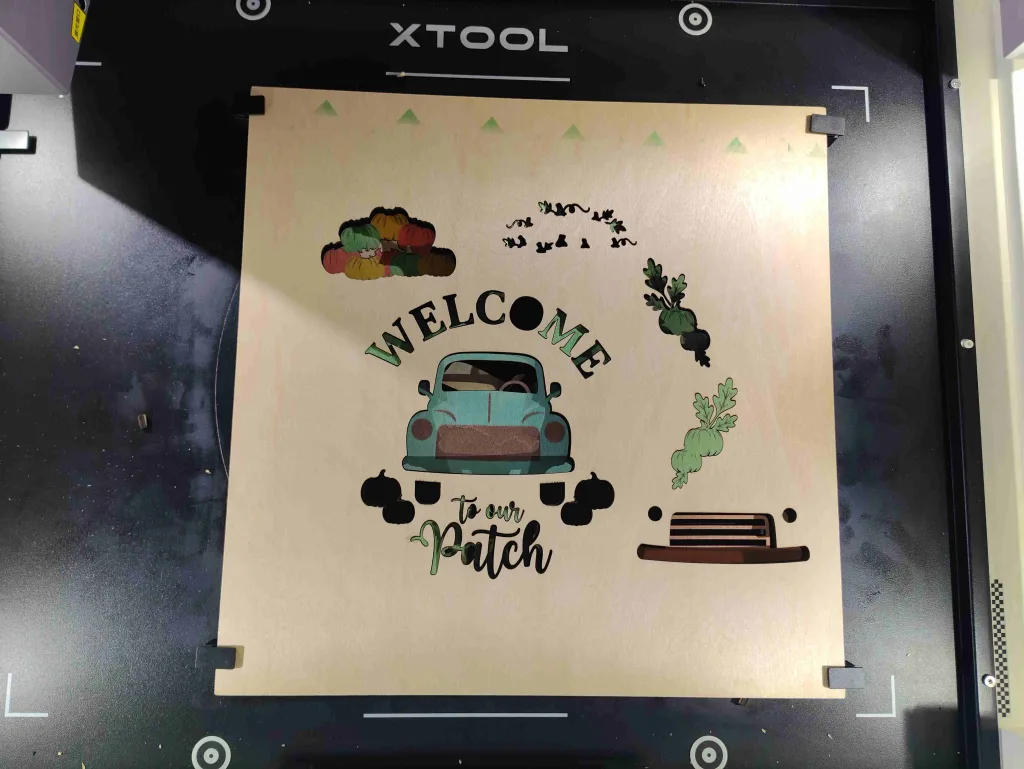
The real magic happens right after the tool change. As shown in the photo above, the 10W laser module instantly aligned itself and precisely cut along the vector offset lines, popping out each intricate piece with flawlessly clean edges and zero alignment shifting.
To bring the entire project together, I used a standard oil-based craft glue to layer and bond the individual wooden pieces. As you can see in the final image below, the result is a beautiful, dimensional, full-color wooden craft that looks incredibly professional and feels ready for a retail shelf.
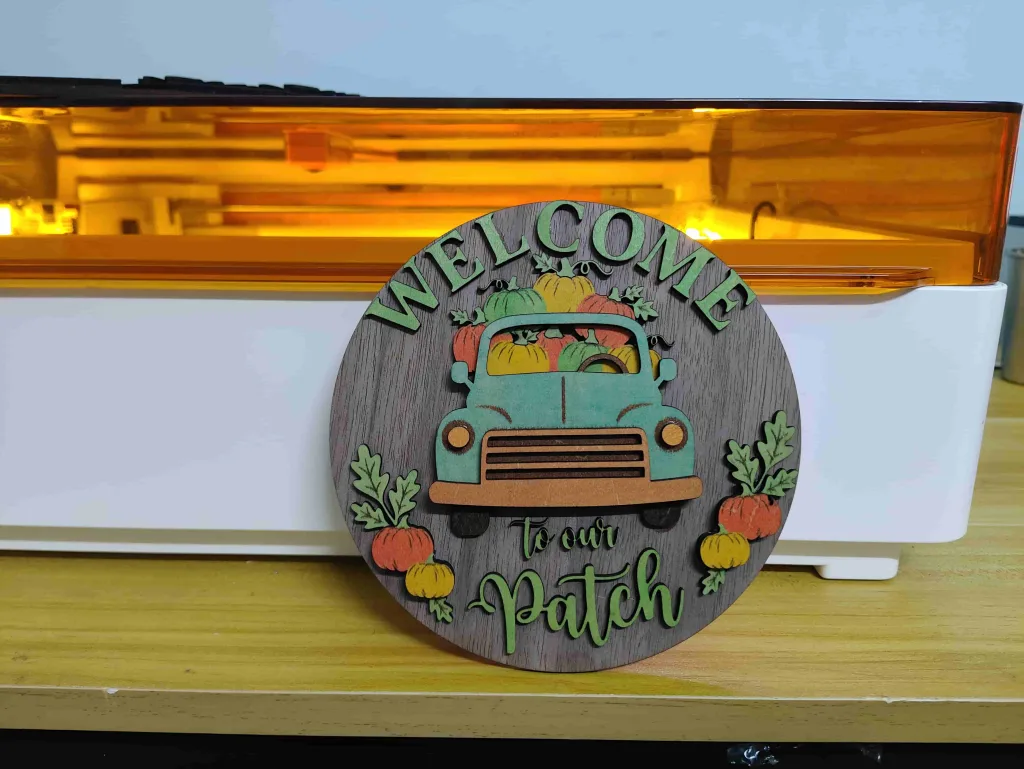
The seamless synergy between the inkjet module and the laser module in this print-then-cut workflow truly unlocks a new level of creative freedom, making large-scale complex projects feel effortless. To push the machine a bit further, I didn’t stop at small cutouts—I went ahead and created a much larger, multi-layered color craft project to see how it handles grander designs.
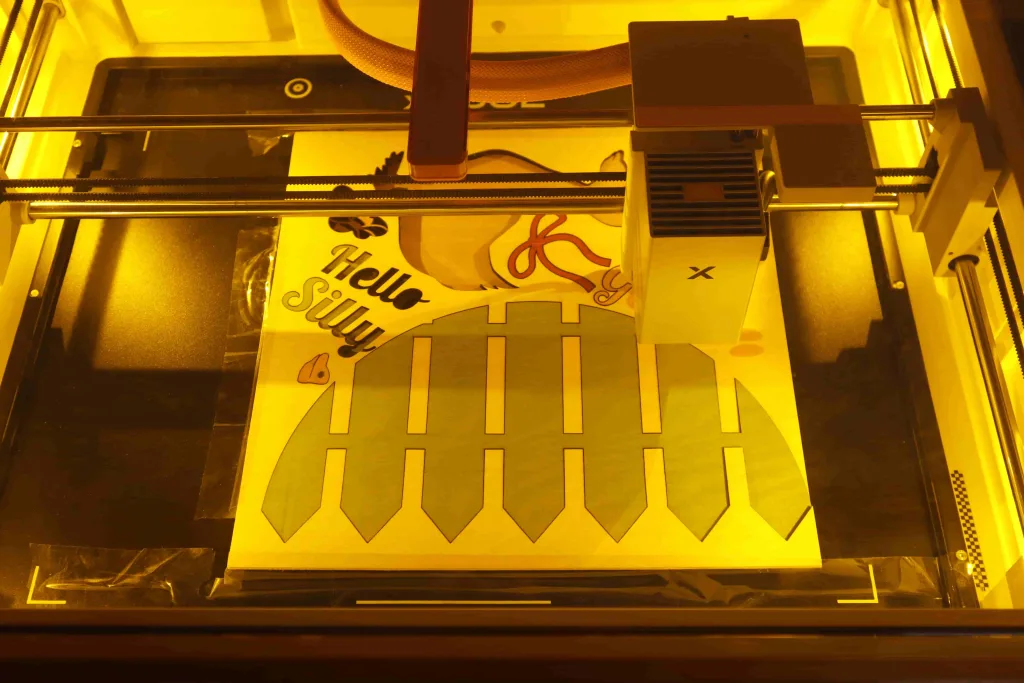
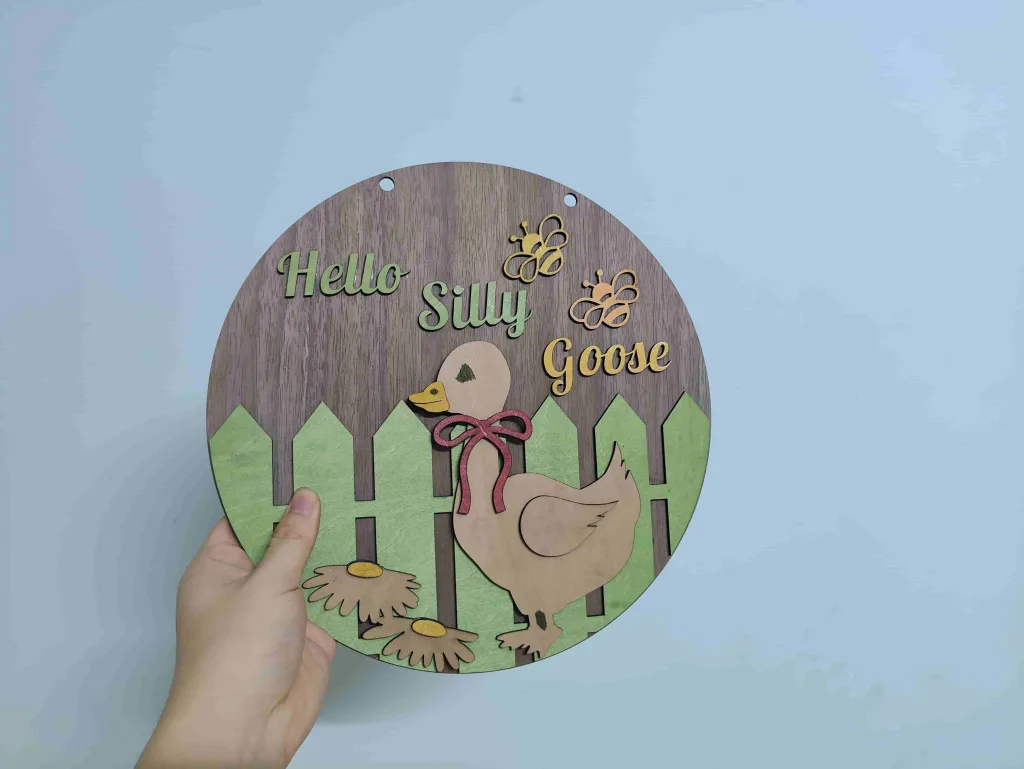
Ultimately, the xTool M2 completely redefines the printing and cutting experience for desktop creators. By consolidating two traditionally separate hardware processes into one intelligent, software-driven workflow, it removes the anxiety that has frustrated Cricut users for years. While you do still need to spend a few seconds manually swapping the inkjet head for the 10W laser module mid-project, the software makes the transition so seamless. For anyone looking to produce high-end, colorful craft decor or intricate multi-material crafts without the hassle of a complex multi-device setup, the xTool M2 proves itself to be the reliable one-stop solution on the market right now.
Rotary Attachment Test: Cylinder Engraving Without a Riser Base
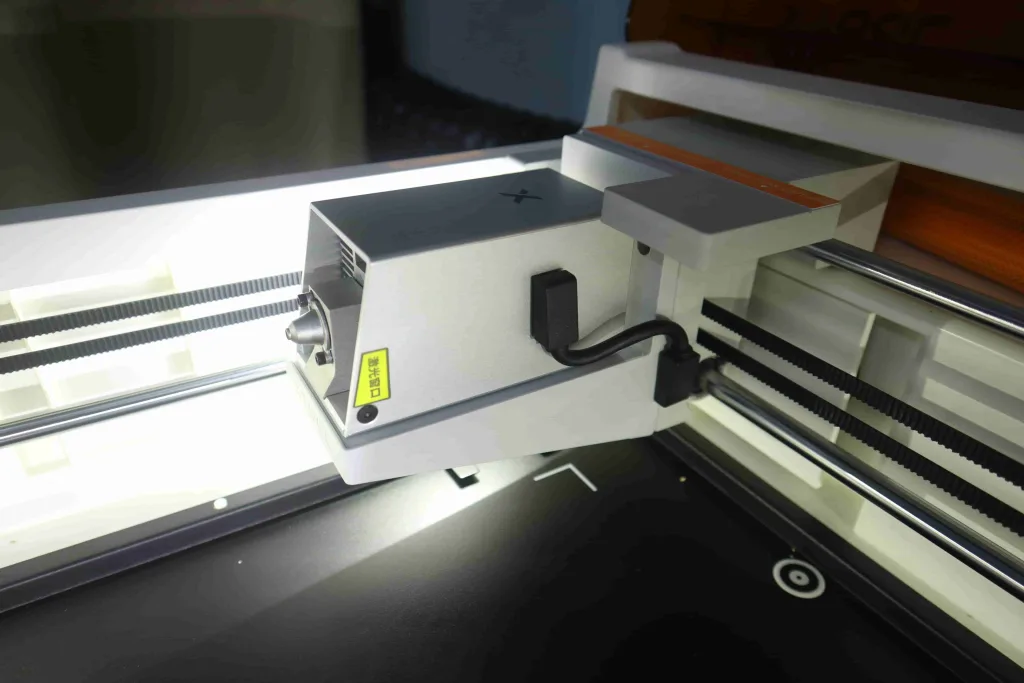
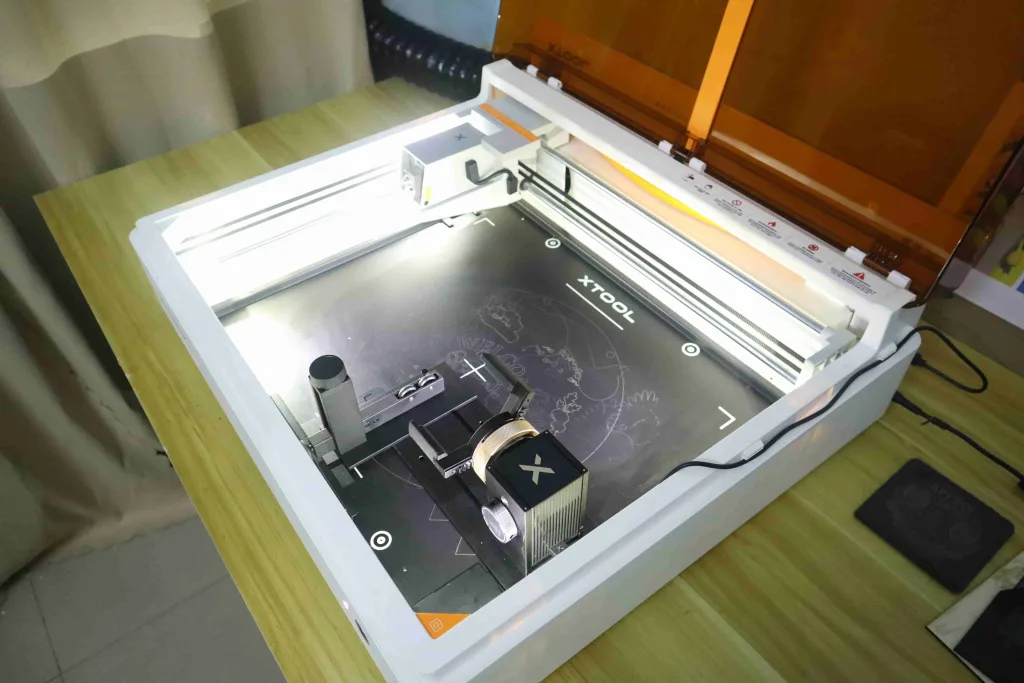
Next, I moved on to explore the cylinder engraving capabilities of the xTool M2. Setting up the xTool M2 for cylinder engraving is highly straightforward, completely removing the setup friction that traditionally frustrates desktop laser users. Thanks to the innovative magnetic directional laser mount, you don’t need any tools or complex realignments to change the laser’s orientation.
Following this, the quick installation of the rotary module takes only a few steps. Because the machine’s clever engineering eliminates the need for a bulky, expensive riser base, the rotary attachment sits directly inside the native machine chamber. It is a very practical, space-saving design that turns a typically frustrating setup into a seamless, plug-and-play experience—proving that versatility doesn’t require a complicated hardware setup. It’s an incredibly clever design. While the xTool M2 isn’t the first machine to adopt this approach, it’s worth noting the TOOCAA NOVA, which features a 90° X-axis rotation specifically engineered to eliminate the hassle of complex rotary setups.
Smart Rotary Workflow: Normal vs. Modeling Process
Beyond hardware innovations, the xTool Studio software introduces an intelligent rotary engraving workflow that vastly simplifies cylinder projects. The software offers two distinct modes for cylinder engraving. The first is Normal Process, designed for regular cylinders with a constant diameter. The second is the Modeling Process, which is specifically engineered for irregular cylinders where the diameter changes along the height. No matter which mode you choose, the workflow is incredibly straightforward.
The biggest game-changer is that you no longer need to manually measure the cylinder’s diameter or perimeter. The xTool M2 handles auto-focusing and automatically measures the object’s dimensions for you. Everything is completed with just a few clicks in the software. For traditional rotary module users, especially power users who do this daily, this automated preprocessing workflow is a massive timesaver.
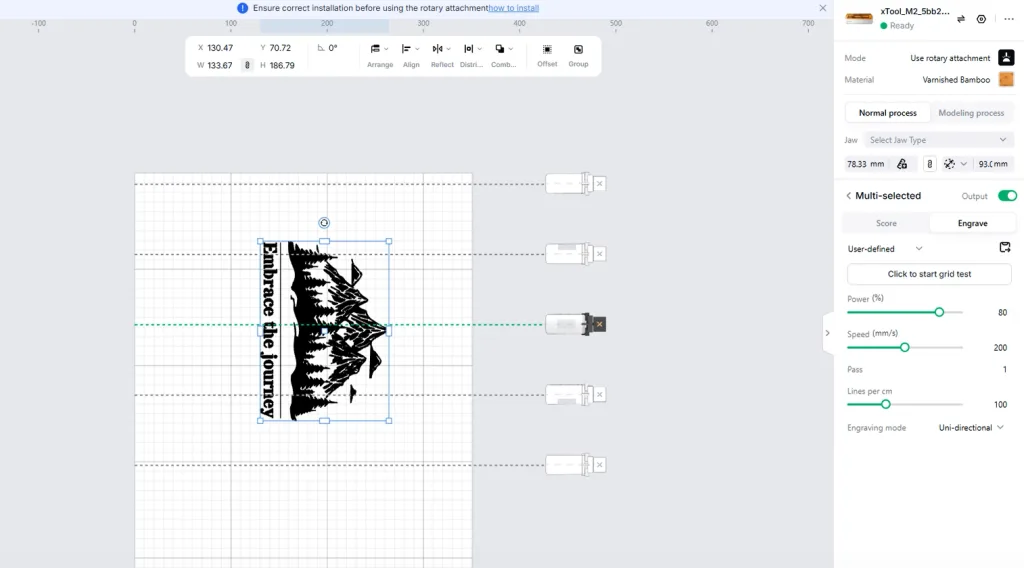
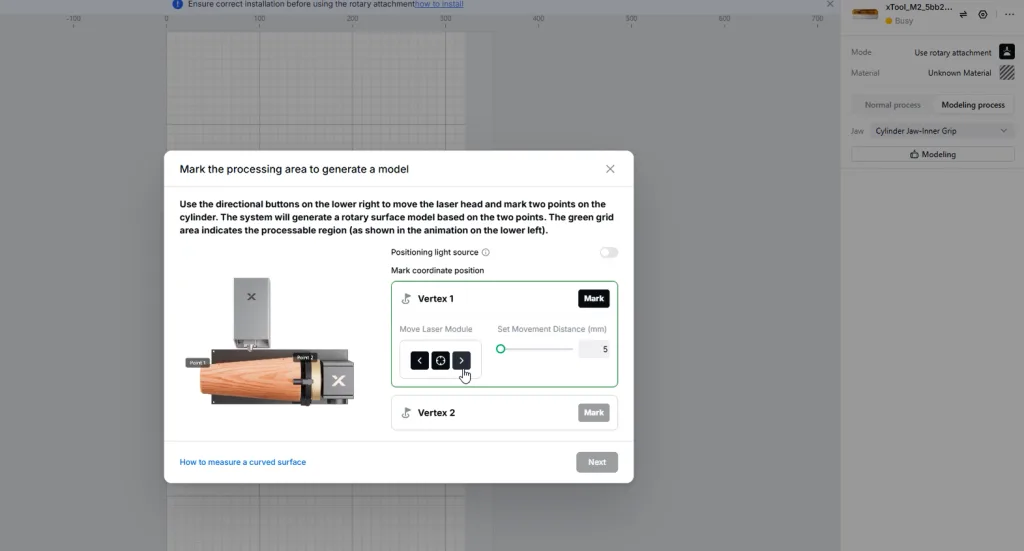
As mentioned, the Modeling Process is built for irregular items like tapered tumblers or flared mugs, where the diameter changes with height. In the past, engraving patterns on these surfaces would result in ugly distortions. The xTool M2 solves this distortion issue perfectly. The concept is highly practical: similar to curved surface laser engraving, the xTool M2 uses multi-point probing across the object’s surface to collect distance data and build a digital model. Once this data is gathered, the software automatically compensates for any warping, ensuring your design engraves flawlessly without distortion.
For the following two examples, I engraved a straight bamboo pen holder and a tapered stainless steel tumbler. As you can see from the images above, whether engraving straight cylinders, tapered cups, or flared mugs, the xTool M2’s rotary modes handle them flawlessly.
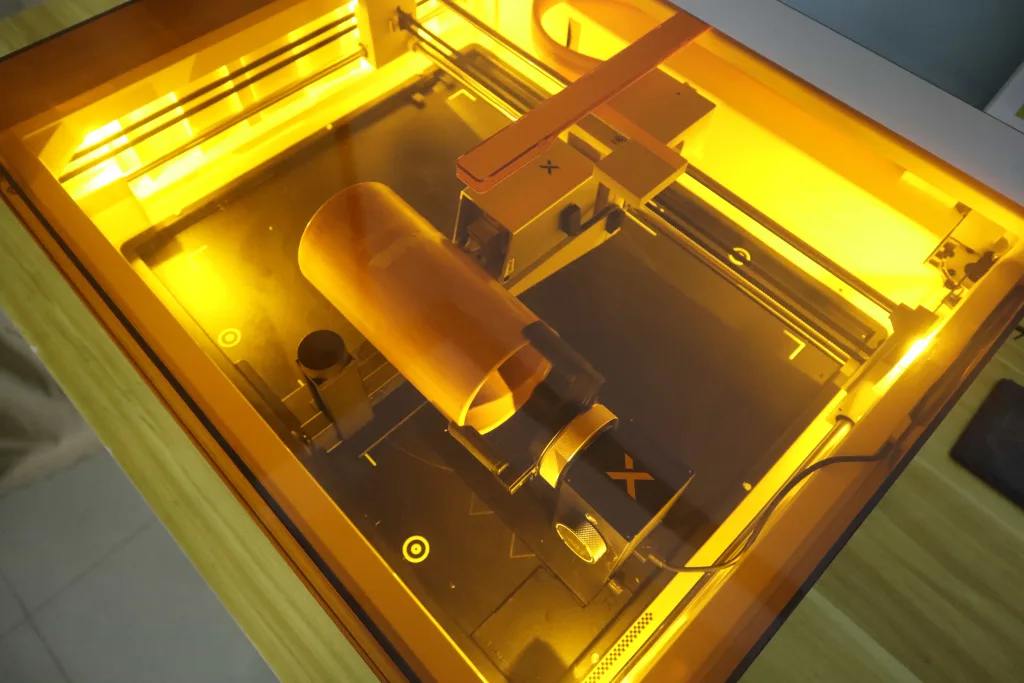
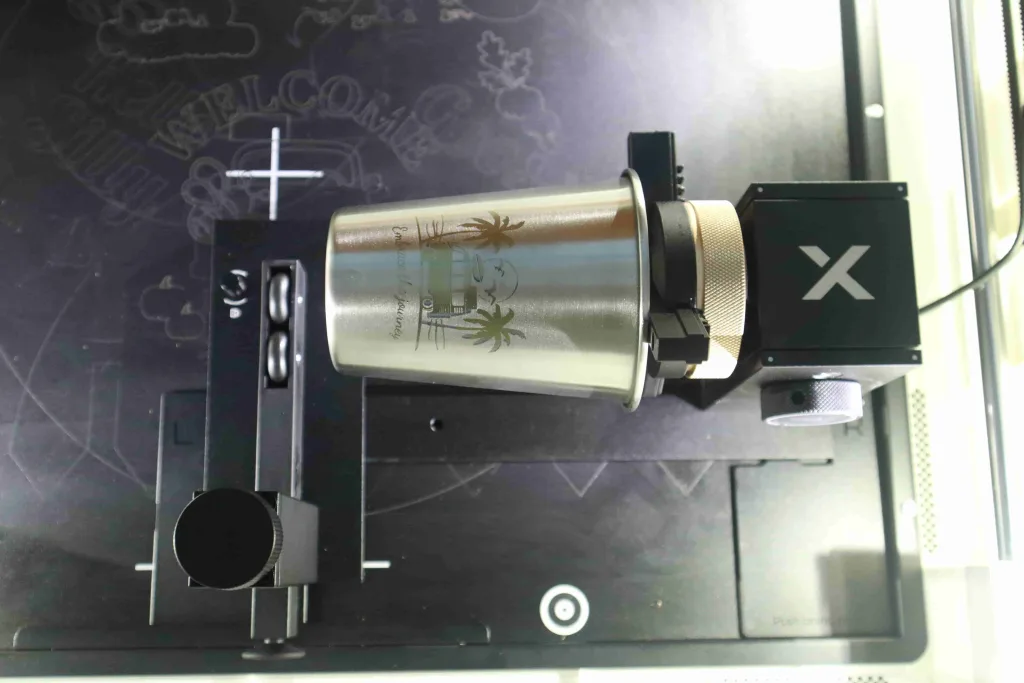

I have to commend xTool for their excellent design of this creative workflow. Throughout the entire process, the sheer convenience really stands out. From installing the rotary module to setting up the physical dimensions and engraving parameters, all the preprocessing is completely smart and automated. Instead of getting bogged down in tedious manual measurements, everything is completed with just a few clicks in the software.
10W Laser Module Image Test
So far, we’ve seen how the xTool M2 shines with its versatile color crafting and its incredibly user-friendly rotary setup. But strip away the color inkjet printing and the rotary features, and a fundamental question remains: How does the M2 perform as a pure, standalone laser engraver? To find out, I put its core hardware to the test with a dedicated 10W laser module image test to evaluate its raw engraving speed, detail, and grayscale accuracy.
I tested the image engraving performance of the xTool M2 10W diode laser module on three different materials. All settings were based on the automatic recommendations from the xTool Studio software. First, for the plywood image engraving, the parameters were set to 80% power, 200 mm/s, Jarvis dithering, and 100 lines per cm. The result aligns perfectly with what I expect from a quality diode laser. The second test was on black acrylic, using the software’s recommended settings: Invert mode, 40% power, 120 mm/s, Jarvis, and 120 lines per cm. As you can see, the outcome also meets the standard expectations for a diode laser.

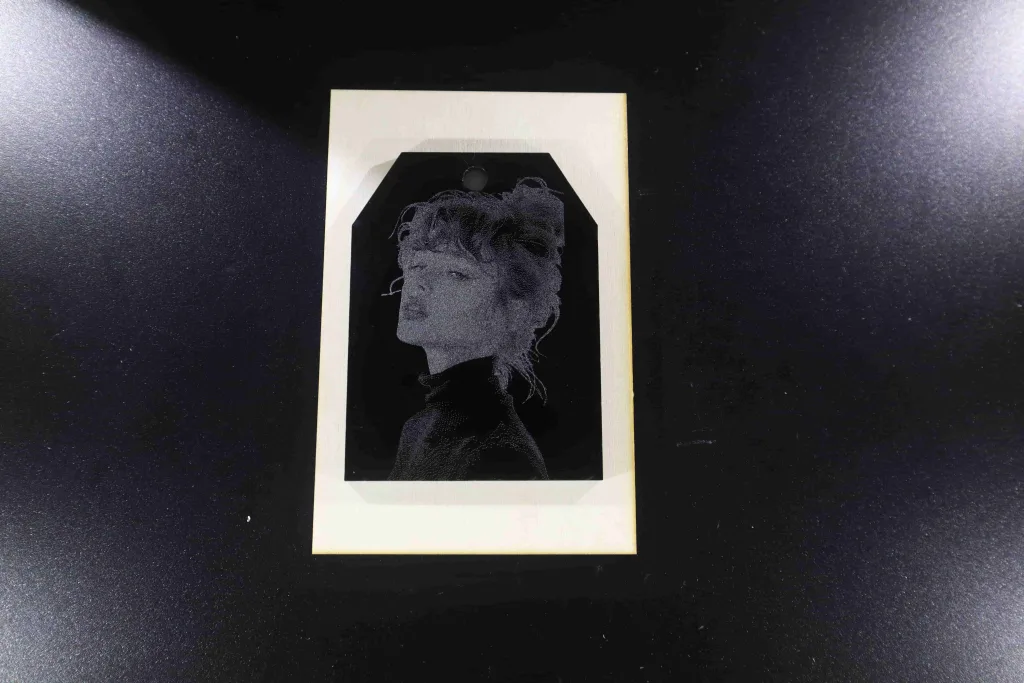
However, once you find a material that pairs perfectly with a diode laser, the true detail and precision of the xTool M2’s photo engraving really shine. The image below shows a photo engraved on a black anodized aluminum business card—using the exact same portrait image as on the plywood test. The settings for the black cardstock were: Invert, 35% power, 250 mm/s, Jarvis, and 100 lines per cm. As you can see, the engraving quality is excellent, with highly accurate facial details and minimal loss of detail.
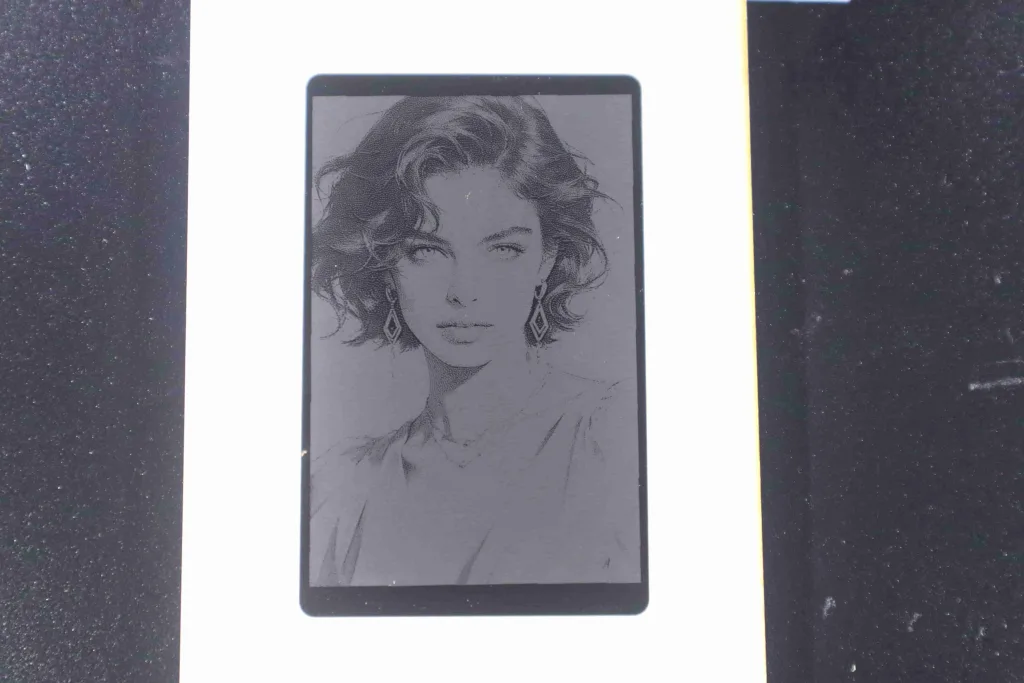
Overall, when it comes to image engraving, the xTool M2’s laser module remains at an excellent level among diode lasers. That said, as a diode laser, its image engraving sharpness and high-definition clarity cannot quite match the performance of a fiber or UV laser, such as the xTool F2 Ultra 5W UV. But in short, if you need to engrave photos on materials well-suited for a diode laser, the xTool M2 will still get the job done beautifully.
Batch Production Test: Designing for Small Businesses
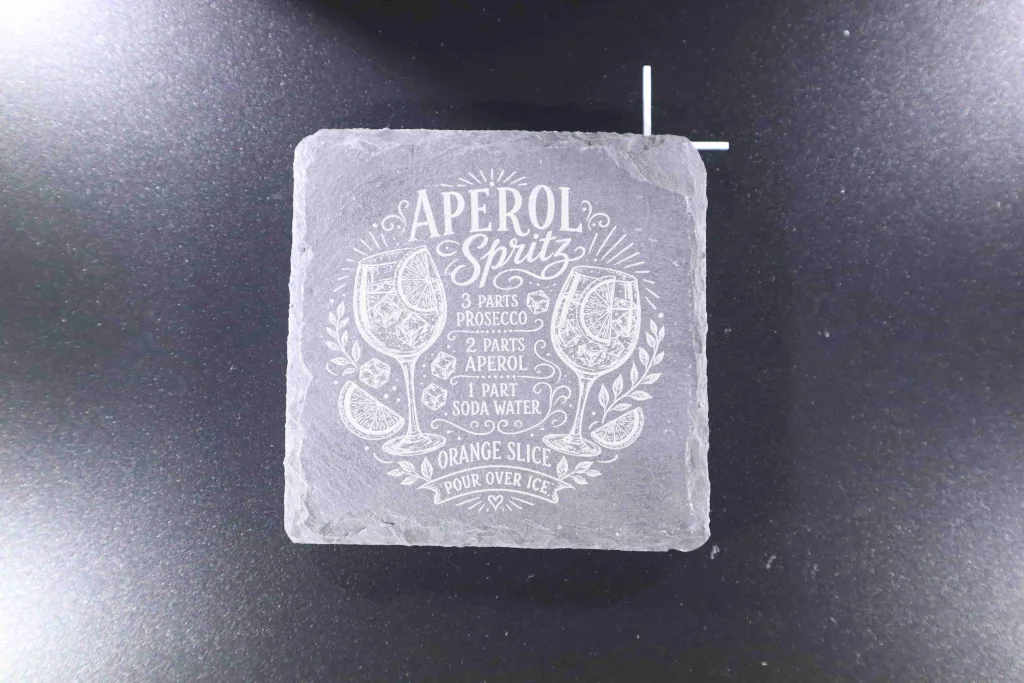
Batch processing is exceptionally well-suited for high-volume engraving on regularly shaped items. As shown in the image below, I put this to the test by batch-engraving twelve 0.5 mm thick oak sheets simultaneously.
Before the batch laser engraving process, the xTool M2 utilizes its close-up camera to capture a high-precision shot of the entire workspace. The primary benefit of this setup is that it ensures maximum accuracy for the software’s automatic graphic duplication. As you can see, the camera is incredibly smart and precise at identifying the shape of each object, and the auto-fill layout aligns perfectly. That being said, this batch feature currently works best with standard rectangular or circular blanks. You might notice that the auto-fill system does not automatically detect the orientation of how the items are rotated. If you are working with uniquely shaped items that require the design to face a specific direction, the automated batch alignment might run into errors.
Nevertheless, for regular rectangles, circles, or any project where the orientation of the graphic isn’t critical, this batch engraving workflow is incredibly efficient.
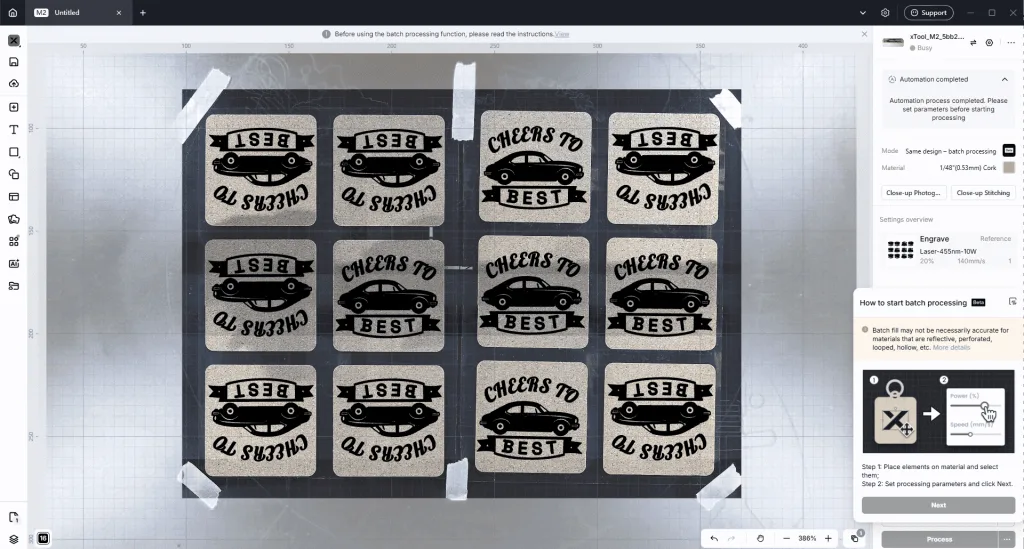
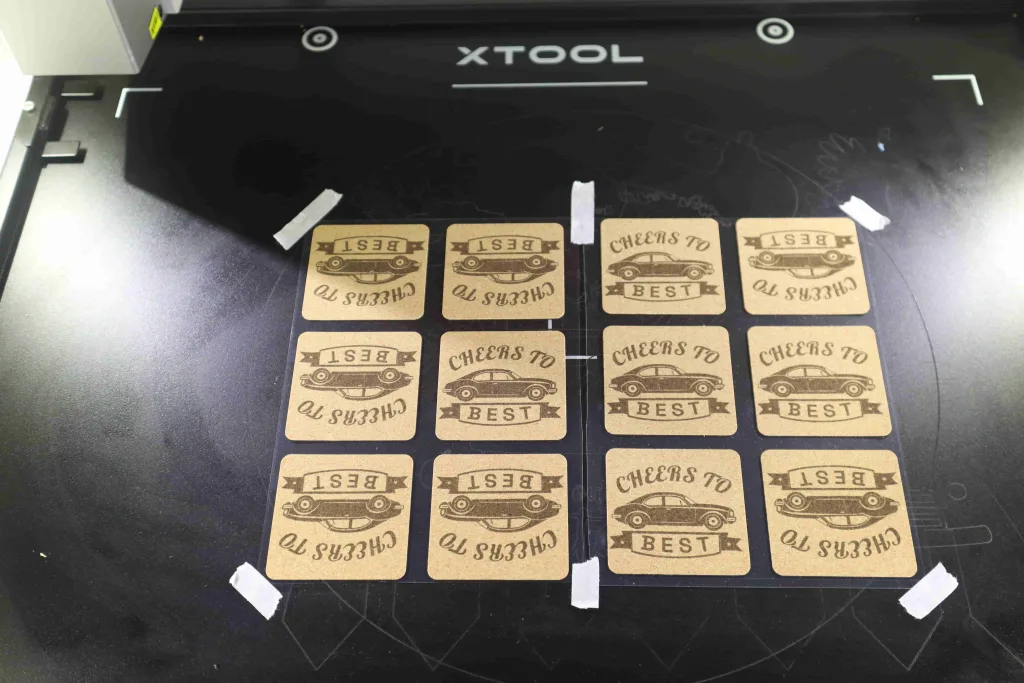
The actual engraving results are shown in the image above, with every design engraved precisely where it was placed in the software. Looking closely, there is no visible deviation between the software’s layout preview and the final physical engraving. I am thoroughly impressed once again by the xTool M2’s camera positioning. Even during large-scale batch jobs, it completely delivers a reliable, what-you-see-is-what-you-get experience.
From a commercial perspective, the xTool M2 easily doubles as the best laser engraver for small business startups. When paired with its zero-riser rotary module, it acts as a smooth, accurate laser engraver for tumblers, mugs, and cylindrical blanks. Crafters looking to expand their Etsy catalog can also produce custom crafts, such as multi-layered wooden jewelry boxes, customized keepsakes, and colorful home decor.
Where the xTool M2 Excels
The real strength of the xTool M2 lies in how it simplifies the workflow for desktop creators, delivering several standout advantages right out of the box:
- Seamless One-Step Color Crafting: Unlike traditional laser cutters that require a tedious process of masking, painting, and weeding to achieve color, the M2’s built-in inkjet module applies vibrant graphics directly onto your materials in a single job. It brings digital color precision and precise laser cutting under one single hood, making it incredibly efficient for creating layered wood art or colorful personalized merchandise.
- Zero-Friction Rotary Automation: xTool M2 has completely removed the typical hardware headaches that usually slow down cylinder engraving. Traditional rotary setups force you to use calipers to manually measure diameters and calculate circumferences before hitting start. With the M2, you simply place your object—whether it is a straight bamboo pen holder or a tapered stainless steel tumbler—and the machine handles the auto-focusing and automatic dimensions measurement for you.
- High-Precision Camera Positioning: For makers looking to scale up their inventory, the close-up camera offers a reliable what-you-see-is-what-you-get experience. When you fill the bed with standard blanks like rectangular oak sheets or circular coasters, the xTool Studio software’s auto-fill layout aligns perfectly. Looking closely at the finished pieces, there is no visible deviation between the software preview and the actual physical engraving.
- Space-Saving Studio Hub: By combining a 10W/20W diode laser, an inkjet printer, and an intelligent rotary workflow into a single machine, the M2 eliminates the need to buy expensive hardware add-ons or separate riser bases. It serves as a highly versatile, compact creative workspace that is perfect for a small home studio.
Areas for Improvement
- More Secure Material Clamps Needed: A sturdier material clamping system is necessary to prevent any shifting during the Print-and-Cut process. Currently, the edge of the clamp can occasionally be bumped by the inkjet module, causing the material to misalign and leading to an alignment failure.
- Lack of a Base Protective Plate: The machine bed really needs a removable protective tray or shield. After just a few cutting sessions, the bottom floor becomes heavily stained and dirty, which looks unappealing and makes cleanup difficult.
xTool M2 Final Verdict: Is It Worth the Investment?
Whether the xTool M2 is worth your money comes down to what you actually want to make. By combining a 10W or 20W diode laser with a built-in inkjet printing module, xTool has built something specific for hybrid crafters. If you want to make full-color custom gifts, layered wood art, or colorful personalized merchandise, the workflow is incredibly smooth. Being able to switch from flatbed cutting to cylinder engraving without buying a separate riser base makes it a great, space-saving choice for a small home studio.
In short, the xTool M2 is worth the investment if you want an easy, all-in-one creative setup. It gets rid of the usual headaches like manual focusing and complicated rotary installation. For makers who want to combine color printing and laser crafting in a single machine, the M2 delivers exactly what it promises without the technical hassle.
Frequently Asked Questions
Is the xTool M2 a good diode laser engraver for beginners?
Yes. Thanks to its dual-camera system, automated autofocus, and intuitive xTool Studio software, it is one of the most accessible diode laser engravers for beginners and home crafters on the market.
Can the xTool M2 replace a sticker printer and cutter?
Absolutely. By utilizing its hot-swappable CMYK inkjet module and 10W laser, the M2 operates as a true print-then-cut system that seamlessly prints and contour-cuts stickers without manual registration marks.
Is the xTool M2 a good laser engraver for tumblers and small business gifts?
Yes. The native rotary setup requires no riser base, making it an efficient laser engraver for tumblers and custom merchandise like engravable gifts for women for small business owners.
How does the CMYK inkjet module on the xTool M2 work with the laser cutter?
The xTool M2 features a quick-release magnetic head system. You can print full-color graphics directly onto wood, paper, or sticker paper using the CMYK inkjet head first, then switch to the 10W diode laser head to cut it out precisely.